How to Chroma key in Godot
Chroma key, commonly known as the “green screen” or “blue screen” effect, allows you to remove a specific color from an image or video and replace it with another background. This effect is widely used in video production to composite different elements together seamlessly.
How?
We will achieve the chroma key effect by writing a custom shader in GDScript and using a VideoStreamPlayer node to display the video content.
I think, instead of knowing what to write in shader it is important to know Why?
So, Have a look at this RGB space :
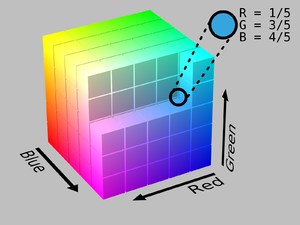
In this RGB space, each color is represented by a set of three numerical values serving as coordinates. For instance, the color green is expressed as (76, 153, 0), where these values are denoted as (R, G, B).

Our next step involves selecting a color from the editor. Afterward, we will remove all pixels that match this color. However, it’s important to note that the entire green screen won’t be entirely composed of just this exact color; there may be varying shades of green. To address this, we will consider color values close to this chosen green color in the 3D color space and set a limit on how far we can deviate from this color in space.
Scene Setup
Ensure that the scene contains a VideoStreamPlayer node to play the video and a Control node to hold the UI elements for controlling the chroma key effect.

HSlider1 is to control the pickup_range how far we can go from the chosen color.
HSlider2 is to control the fade effect to smoothly discard the pixels near the chosen colors.
Writing the Custom Shader
To implement the chroma key effect, follow these steps:
1. Select the VideoStreamPlayer node in the scene and go to its properties. Under CanvasItem > Material, create a new shader named ChromaKeyShader.gdshader
2. In the ChromaKeyShader.gdshader file, write the custom shader code as shown below:
shader_type canvas_item;

// Uniform variables for chroma key effect
uniform vec3 chroma_key_color : source_color = vec3(0.0, 1.0, 0.0);
uniform float pickup_range : hint_range(0.0, 1.0) = 0.1;
uniform float fade_amount : hint_range(0.0, 1.0) = 0.1;

void fragment() {
    // Get the color from the texture at the given UV coordinates
    vec4 color = texture(TEXTURE, UV);

    // Calculate the distance between the current color and the chroma key color
    float distance = length(color.rgb - chroma_key_color);

    // If the distance is within the pickup range, discard the pixel
    // The lesser the distance, the more likely the colors are similar
    if (distance <= pickup_range) {
        discard;
    }

    // Calculate the fade factor based on the pickup range and fade amount
    float fade_factor = smoothstep(pickup_range, pickup_range + fade_amount, distance);

    // Set the output color with the original RGB values and the calculated fade factor
    COLOR = vec4(color.rgb, fade_factor);
}
Shader Explanation:
The shader uses the distance calculation to identify pixels close to our chosen chroma key color and discards them, effectively removing the selected color. Pixels that are slightly further away from the chroma key color are faded based on the fade_factor, blending them smoothly with the surrounding colors. This process creates the desired chroma key effect, making it appear as if the background has been replaced with another image or video.
UI Controls
To allow users to manipulate the chroma key effect in real-time, I created sliders in the Control node. The Control node’s script contains the following functions:
extends Control

func _on_color_picker_button_color_changed(color):
    # Update the "chroma_key_color" shader parameter of the VideoStreamPlayer's material
    $VideoStreamPlayer.material.set("shader_parameter/chroma_key_color", color)

func _on_h_slider_value_changed(value):
    # Update the "pickup_range" shader parameter of the VideoStreamPlayer's material
    $VideoStreamPlayer.material.set("shader_parameter/pickup_range", value)

func _on_h_slider_2_value_changed(value):
    # Update the "fade_amount" shader parameter of the VideoStreamPlayer's material
    $VideoStreamPlayer.material.set("shader_parameter/fade_amount", value)

func _on_video_stream_player_finished():
    # Restart the video playback when it's finished
    $VideoStreamPlayer.play()
also make sure that the range of the sliders are appropriate, my settings are :

Also you can set steps by hint_range in the shader.
hint_range(MIN_VALUE, MAX_VALUE, STEPS)
Signal Handling
Connect the appropriate signal from the UI elements to the Control node’s script. you created in the Control node’s script to control the chroma key effect. These signal handlers will update the shader’s uniform variables in response to user input.
Connect sliders change signal to the sliders, finished signal to VideoStreamPlayer and Color changed to the ColorPicker.
Woah!
Save and run the scene to see the chroma key effect in action! With the provided UI controls, you can now adjust the chroma key color, pickup range, and fade amount in real-time, achieving the desired chroma key functionality for your video content.